
Extensive Fracture Class IV Strength Restoration: Direct Resin Using
Aesthetic Prefabricated Post and FRC Substructure
Extensive Fracture Class IV Strength Restoration: Direct Resin Using
Aesthetic Prefabricated Post and FRC Substructure
By Dr. Eloy Burga Noriega, DDS
Summary: This article demonstrates a predictable methodology based on the incremental application of composite resins and modifiers to transform an extensive class IV fracture into a restoration that mimics nature. It focuses on the importance of saving the remaining sound structure and the reestablishment of proper function and aesthetics of anterior teeth implementing conservative techniques that allow for the possibility of further aesthetic options, which is something very important for the very young patients. A main conclusion is that the load-bearing capacity of fractured teeth restored with FRC is higher than that of teeth restored with the conventional adhesive-composite technique.
Resumen
Este artículo muestra una metodología predecible basada en la aplicación incremental de resinas compuestas y modificadores para transformar una extensa fractura clase IV en una restauración que imita a la naturaleza. Se enfoca en la importancia de preservar el remanente dentario y en el restablecimiento funcional y estético de los dientes anteriores, implementando técnicas conservadoras que dejan abierta la posibilidad de utilizar otras opciones estéticas en el futuro, lo cual es muy importante en particular para los pacientes jóvenes. Una conclusión importante es que la capacidad de soporte de carga de los dientes fracturados restaurados con FRC es mayor que la de los dientes restaurados con la técnica convencional de composite adherido.
Anterior teeth fracture requires a multidisciplinary approach; it is one of the greatest challenges for the clinician. Reestablishment of proper function and aesthetics is particularly vital in anterior teeth at any age, but extremely important for the very young patient because the front position is easily noticed and if not restored nicely it creates psychological problems for both children/teenagers and their parents.
To save the remaining sound structure is a powerful motivation both for the patient and for the clinician and that is possible by using various post materials and adhesive systems introduced over the years, but “clinicians have reevaluated the dogma of traditional restorative dentistry and seek alternative methods to build up devitalized teeth” . In our opinion, this pushes the dentist to consider the use of direct resin bonded composite restorations as the treatment of choice whenever approppriate.
As new in vitro research studies found, fiber–reinforced composite (FRC) can be used as substructure under composite resin to improve the load-bearing capacity of the combination of materials. In fact, bilayered dental composite resin is an alternative to fight against some potential problems of composite restorations in areas under high-stress.
This case reports an experimental clinical technique for the restoration of two central anterior teeth with extensive class IV fracture that compromises pulpar tissue (Fig.1) It focuses on the restoration of devitalized teeth structurally compromised, with the aim of conserving the remaining sound structure using a combination of resin bonded composite with reinforced fiber and prefabricated post systems.
The learning objective of this article is not only to report how to obtain a beautiful direct resin restoration but also to state that this restoration makes it posible to consider other possibilities in the future, such us indirect veneers with minimal preparations.
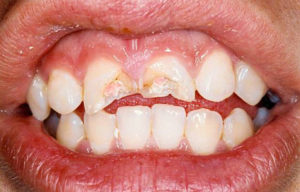
Figure 1: Class IV fractures involve the pulp
CASE PRESENTATION
A 16-year-old girl in excellent health presented with Class IV fracture on teeth 8 and 9, with pulpal exposure, due to a sports-related trauma. (Fig. 2)
Neither the patient nor her parents were interested in and irreversible, indirect treatment option. Their family dentist suggested the placement of crowns to restore the teeth, but they wanted a second opinion.
We suggested a more conservative restoration alternative to pursue and immediate functional and aesthetic result.
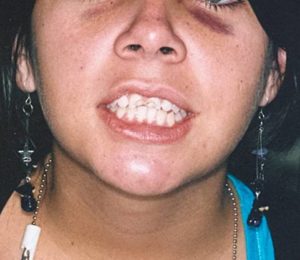
Figure 2: The patient presented to the office after accident
PRETREATMENT PROCEDURES
Clinical data was obtained through preoperative study models, 35mm preoperative photographs, examination and a full-mouth series of radiographs, and a diagnostic wax-up.
The clinical evaluation revealed a large Class IV fracture, involving approximately more than half of teeth 8 and 9. Teeth 8 and 9 had a significant crown fracture extending horizontally in a linguo-mesio-facial direction with pulp exposure. The fracture line extended into the dentin. No teeth mobillity was noted but a radiograph revealed a fracture slightly above the osseous crest. (Fig. 3)
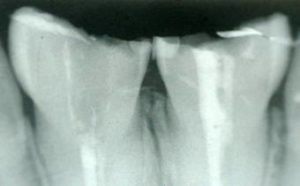 Figure 3: Radiographic examination revealed a
fracture slightly above the osseous crest.
TREATMENT
The treatment plan of choice was to restore the class IV fractures with direct resin composite, prefabricated post (Fig. 4), and fiber-reinforced composite (Fig. 5).
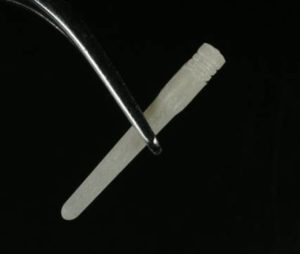
Figure 4: Prefabricated post
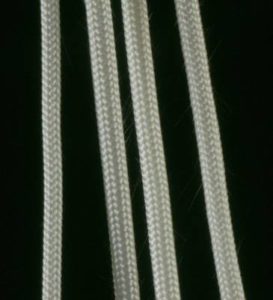
Figure 5: Glass Fiber reinforcing rope (GlasSpan)
After the endodontic therapy on the compromised teeth , the dentinal walls were cleaned using a rotary reamer, making sure to remove all filling material and sealer. (Fig. 6).
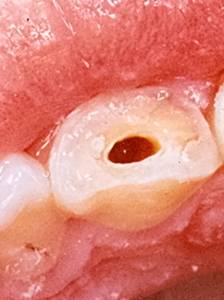 Figure 6: Dentinal walls were cleaned
| 3 | The endodontic teraphy was performed by Dr. Jaime Dibán Diban, a well-known specialist in endodontics, professor and lecturer. |
Preparation of the rope
1. The glass fiber- reinforcing rope was selected, choosing a medium rope. Then the fiber was measured (Fig. 6)
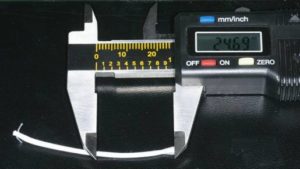
Figure 6: FR was measured
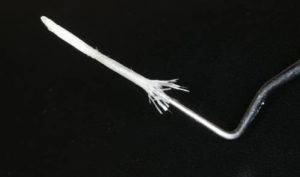
Figure 7: Aplication of flowable composite
4. A point was created with a bur ( 6885 Brasseler) (Fig. 8)
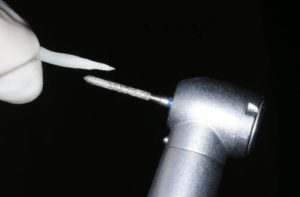
Figure 8: Creation of a point in the glass fiber- reinforcing rope
5. An instrument similar to an endodontic plugger was introduced into the hollow of the rope and then a light layer of autopolimerizing resin composite cement was applied. (Fig. 9)
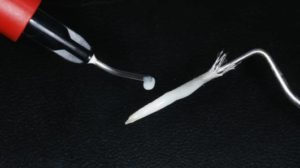
Figure 9: Applying composite cement
Cementation
For the cementation of the prefabricated post and the glass, fiber autopolimerizing resin composite cement was used and sixth-generation bonding agent with a self-etching primer. (Fig. 10)
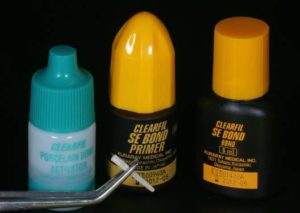
Figure 10: Sixth-generation bonding
A Centrix syringe was used to inject a dual cured resin cement composite in the root canal space. After that, the prefabricated post was pushed into place and, holding it still, the glass fiber- reinforcing rope was introduced into the mesial space using an instrument similar to an endodontic plugger until it fits.
When the glass fiber- reinforcing rope was in it´s place the instrument was taken out and with a needle tip dispenser the flowable resin composite ws injected into the hollow end of the rope until it was completely full. (Fig. 11)
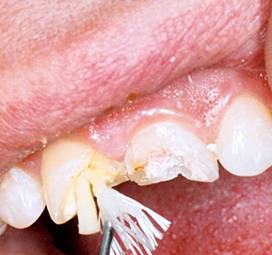
Figure 11: Injecting the flowable composite into the rope
The needle was taken out and flowable resin composite was applied around both reinforcing structures (Fig. 12), curing with the polymerization light for sixty seconds.
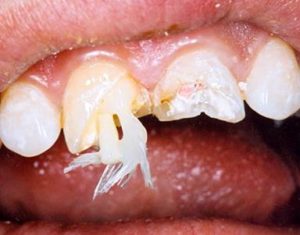
Figure 12: Post and FRC form a new substructure
Composite Layering
Composite layering was accomplished using the anatomic stratification technique. Due to the fact that each layer has different shades and opacities, to obtain a more realistic depth of colour it is necessary to stratify the layers, thus creating a polychromatic effect and recreating the way light is reflected, refracted, transmitted, and absorbed.
Shade layering varies from case to case. In this particular one, we analyzed the teeth shade and made the shade selection visually comparing the natural teeth shade to standard dental shade guides.
In order to achieve maximum aesthetics, the dentist must be able to use multiple layers of composite along with opaquers and tints. The stratification and proper placement of opaquers and tints will help replicate the polychromatic characteristics of the natural dentition.
| 4 | Margeas, Robert C. The Direct Class IV Retoration: Case Report. www.aluro.co.nz/supplies/pdf/Robert%20C.%20Margeas.pdf |
Bonding and procedure
Free-hand bonding gave us absolute control over each restorative step . To sculpt composites into a precise anatomic form relies on the artistic eye of the clinician.
A scalloped bevel on the chamfer was placed to break up the straight chamfer line with a long tapered diamond. After that a self-etching primer was applied to all the surface of the coronary remainder.
The material used was the Empress Direct (Vivadent), GC Kalore (GC America) and others such as Gradia (GC America). Also tints and opaquers. (Fig. 13)
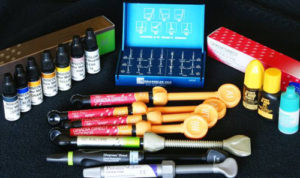 Figure 13: Part of the armamentarium
The initial layer in palatal wall with an opaque composite resin (Microhybrid) was applied. The artificial dentin was built up in small increments; each increment was polymerized for 20 seconds. (Fig. 14)
| 5 | As Dr. Newton Fahl, Jr. Status “. . . using free-hand bonding, the clinician has absolute control over each restorative step”. Trans-Surgical Restoration of Extensive Class IV Defects in the Anterior Dentition. The Internacional Aaesthetic Chronicle. p. 717. |
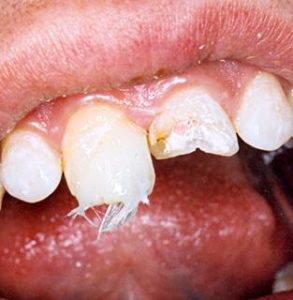
Figure 14: Resin composite shade AO2 was applied
Microhybrid was not applied into incisal to achieve translucency in that area. (Fig. 24).
Because the fracture extended beneath the gum tissue, it was necessary to remove it with electrosurgery so that the fracture line was exposed. (Fig. 15)
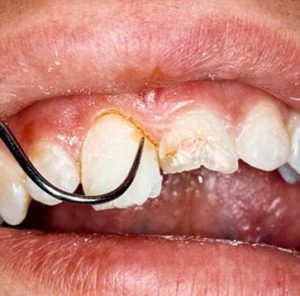 Figure 15: Tissue removal using electrosurgery unit
To camouflage the fracture line, a thin layer of XWB shade of resin (Gradia) was applied. Then an homogeneous layer of BW shade of resin (Gradia) was applied to all the structure. (Fig 16)
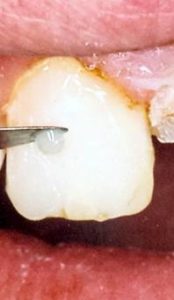
Figure 16: Camouflaging the fracture line
This case required multiple layers of microfill composite to recreate the artificial enamel. We selected shade A1, B1 (IPS Empress Direct and Kalore) for the surface. To contour each layer we used a metal-blanded instrument, evaluating each combination of shades with the reference teeth.
The two teeth were completed in general shape, and then the incisors were cut back to create developmental embrasures; mamelons were also created.
All teeth had a final layer of WT (Gradia) and clear translucent CT (Gradia) composite shade, sculpted using a thin metal-blanded instrument and light cured.
The contouring was initiated with Dura-Green Stones (CN1) (Fig. 17), and the lingual contouring was initiated with a pear-shaped carbide bur. (Fig 18)
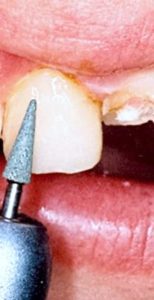
Figure 17 : Contouring
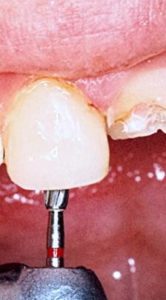 Figure 18: Lingual contouring
The facial surface was sculpted with finishing burs (Composite and Polishing Kit – Brasseler). A metal diamond-coated strip was used to remove the slight excess of composite in the proximal areas. (Fig. 19)
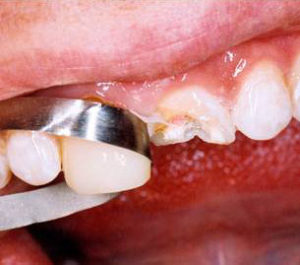 Figure: 19 Removing excess composite
The gingival margin was thinned with an eight fluted Brasseler carbide bur. The proximal, facial, and incisal angles were finished using the Super-Snap Rainbow Kit Polishing System. The disks were used sequentially according to grit, ranging from coarse to extra fine. The finest of the four grits of polishing strips is shown. (Fig. 20) The same procedure is done on tooth 9.
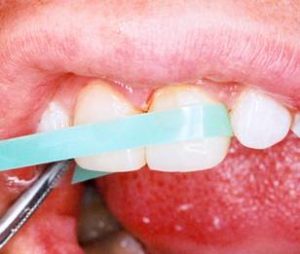
Figure 20: Interproximal area is polished with polishing strips
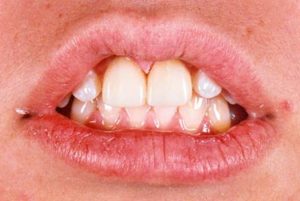
Figure: 21 Primary anatomy
We carefully evaluated the case through a series of photographs; some texture discrepancies and a bubble were revealed and remedied in another appointment with a small diamond. Also, some minor changes in contour were made in order to achieve a better aesthetic result.
The interproximal areas were polished again using aluminium oxide polishing strips. (Fig. 22-23 ) The final gloss was achieved with a polishing brush and polishing paste. (Fig. 24)
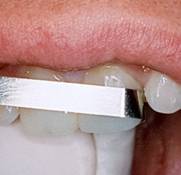
Figure 22: Polishing
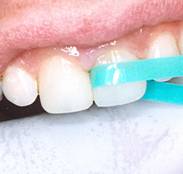
Figure 22: Polishing
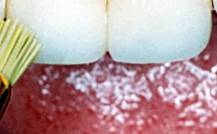
Figure 24: Final gloss
After evaluating the result with a series of photographs we asked ourselves the following question: Do we love the contours? Focusing on the anatomy the answer was no. So we decided that this step was incomplete and improved the contour and accentuated the mamelons. Also the surface characterization was reevaluated in order to improve the chromatic appeareance of the restorations.
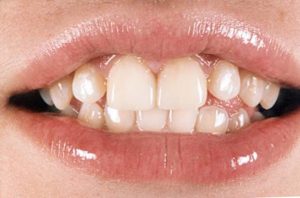
Figure 26: Secondary anatomy
A series of photographs were taken in order to further evaluate the case. We noticed that the teeth were ready to polish so we repeated the steps explained in figures 22 to 24. The result is shown in the next figure (Fig. 28)
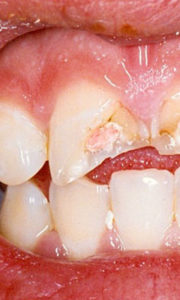
Figure: 27 Before
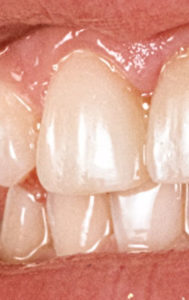
Figure 28: Third anatomy. Microscopic evaluation
Notice the natural-looking restorations with surface morphologic characterizations. The micro and macro textures give the restorations extremely good light transmission properties. The tiny grooves and the lobes simultaneously present optimize reflection and refraction.
The final result is demonstrated in Figure 33. Compare with Figure 29 that shows how the teenager presented to consultation.
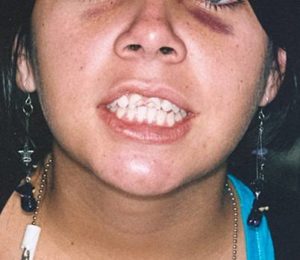
Figure 29: Full face; fractured upper left and right central incisor
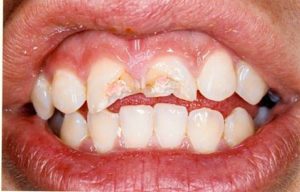
Figure 30: Close up fractured upper left and right central incisor
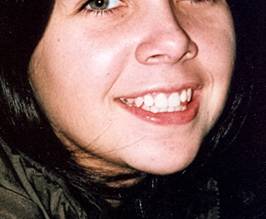
Figure 31: Lateral right view
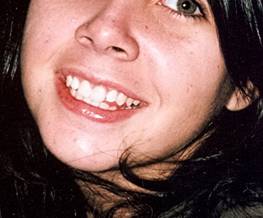
Figure 32: Lateral left view
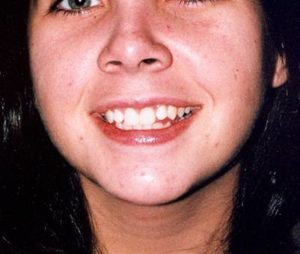
Figure 33: Restored smile
CONCLUSION
Reestablishment of proper function and aesthetics of anterior teeth is a great challenge for the clinician.
Patients of every age, but particularly the very young, can face psychological problems if teeth in the front position are no restored nicely. Implementing conservative techniques allow for the possibility of further aesthetic options in the future, a fact that is particularly important for young patients.
This case demonstrates a predictable methodology based on the incremental application of composite resins, modifiers, and reinforcing materials to transform a class IV fracture into a restoration that mimics nature.
The technique shown in this article allows for immediate biofunctional and aesthetics results, which is something that meets the psychological expectations of many patients with this class of fractures.
The FRC provides and efficient way to redirect the stress applied to the restoration along the remaining tooth structure, thus highly reducing the risk of root fracture. Another advantage is that the flexibility of the glass fiber-reinforcing material allows to orient it toward the area of the teeth chosen by the dentist —something which is not possible with a prefabricated post. The glass fiber is chairside prepared by the dentist for each patient.
The load-bearing capacity of fractured teeth restored with FRC is higher than that of teeth restored with the conventional adhesive-composite technique.
REFERENCES
- Baratieri, L. N et al. Influence of Post Placement in the Fracture Resistance of Endodontically Treated Incisors Veneered With Direct Composite. J Prosthet Dent. 2000
- Baratieri, L. N. Direct Adhesive Restorations on fractured anterior teeth. Chicago. Quintessence. 1998
- Belbedere, Paul D. Full-Mouth Reconstruction of Bulimic-Ravaged Teeth. Using Direct Composites. Article. Dentistry Today January 2009
- Blitz N. Adaptation of a Fiber-Reinforced Restorative System to the Rehabilitation of Endodontically Treated Teeth. Practical Periodontics and Aaesthetics Dentistry Vol. 10 (2): 191-3, 1998, Mar.
- Burga Noriega, Eloy. Creating a new smile with your own hands: Direct Resin Veneers. 2008. Lima Perú www.cosmeticadentalburga.com
- Christensen GJ .Facing the Challenges of Ceramic Veneers. J Am dent assoc.2006
- Christensen GJ. Veneer Mania. J Am Asooc. 2006
- Deliperi, S. ; Bardwell, DN; Coiana,C. Reconstruction of Devital Teeth Using Direct Fiber-Reinforced Composite Resin: A case report. Journal of Adhesive Dentistry. 2005.
- Deliperi, S. and Bardwell, DN. Direct Fiber-reinforced Composite in an Endodontically-Treated Molar: A Three-Year Case Report . University School of Dental Medicine. Boston, MA, USA and Cagliary, Italy
- Dietschi D. Free-Hand Composite Resin Restorations: A Key to Anterior Aaesthetics. Pract periodontics Aesthet Dent . 1995
- Ferrari,M.; Vichi, A.: Grandini, S.; Goracci,C. Efficacy of Self-Curing Adhesive-Resin Cement System on Luting Glass-Fiber Post Into Root Canals: An sem investigation. Int J Prosthodont, 2001
- Garoushi, Sufran; Ballo A. Lasilla LV, Vallittu PK . Fracture Resistente of Fragmented Incisal Edges Restored With Fiber-Reinforced Composite. J Adhes Dent. 2006.
- Garoushi, Sufyan, Pekka Vallittu, and Lippo V. J Lassila. Continuos and Short Fiber Reinforced Composite in Root Post-Core System Of Severely Damaged Incisors. University of Turku. Finland 2008
- Garoushi, Sufyan: The Ultimate Goal of Advance Dental Composite Research. University of Turku, Lemminkaisenkatu 2. Finland 2006
- Hornbrook, D. and Hastings HJ. Use of Bondable Fibers for Post and Cores Build-Up Endodontically Treated Tooth. Maximizing Strength and Aaaesthetics. Practical Periodontics and Aaesthetic Dentistry. Vol. 7. Nº 5.
- Karna, Jon C. A Fiber Composite Laminate Endodontic Post and Core. American Journal of Dentistry, 9 (5): 230-232; October, 1996.
- Kimmel, S.S. Restoration and Reinforcement of Endodontically Treated Teeth With a Polyethylene Ribbon and Prefabricated Fiberglass Post. General Dentistry
- Malterud, ML. Minimally Invasive Restorative Dentistry: A Biomechanic Approach. Prac Proced Aesthet Dent. 2006.
- Margeas, Robert C. The Direct Class IV Restoration. Andrew John Publishing Inc. http://www.andrewjohnpublishing.com/CJRDP/CJRDP%202-1/2-1aesthetic.html (2007)
- Martelli, Hermes. Resistencia a fractura de de. ntes tratados eddodonticamente restaurados com Pinos de Fifra de Vidrio Accesorios Dissertacao (Maestrado em Odontología) Universidade Norte do Paraná, Londrina. 2006.
- Milnar, Frank J. Creating Lifelike Aaesthetic Using Direct Composites. Dentistry Today. August, 2009.
- Mopper, KW. Let¨s Talk Composites. www.dentistrytoday.com.
- Mopper, KW. Maximizing the Potential of Composite: Three Decades of Direct Resin Bonding. Picture Perfect Aaaesthetics. AACD Monograph; vol II . Mahwah, NJ Montaje Media; 2005
- Newton Fahl, Jr. Trans-Surgical Restoration of Extensive Class IV Defects in the Anterior Dentition. The New Face of Aaaesthetics. The AACD Monograph. 2004.
- Ratnadeep Patil & Kavita Mashesh DDS. Anatomic Stratification Techtique for Lifelike anterior composites. Dental Tribune, India
- Strassler, Howard E. Fiber-Reinforcing Materials for Dental Resins. Departament of Endodontics Prosthodontics,and operative Dentistry. University of Maryland Dental School, Baltimore,Maryland.
- Vallittu, PK. Biomedical and Dental Fiber-Reinforced Composites. Departament of Prosthetic Dentistry and Biomaterials Science. University of Turku, Finland
- Willhite, Corky. Dramatic Smile Makeovers Using Direct Resin Veneers. Compendium, July 1997. Accreditation Review: Complex Bonding; AACD Journal, Winter 1997.
- Willhite, Corky. Composite Bonding: The “Ultimate Aesthetic” Course. Valley Forge Dental Conference March 5, 2010-04-15
- Willhite, Corky. Diastema Clousure With Freehand Composite: Controlling Emergence Contour. Quintessence Internationa. Volumen 36. Number 2, February, 2005
Disclosure: Dr. Eloy Burga receives no compensation from the manufacturers of any of the products mentioned in this article.
